Work Estimate

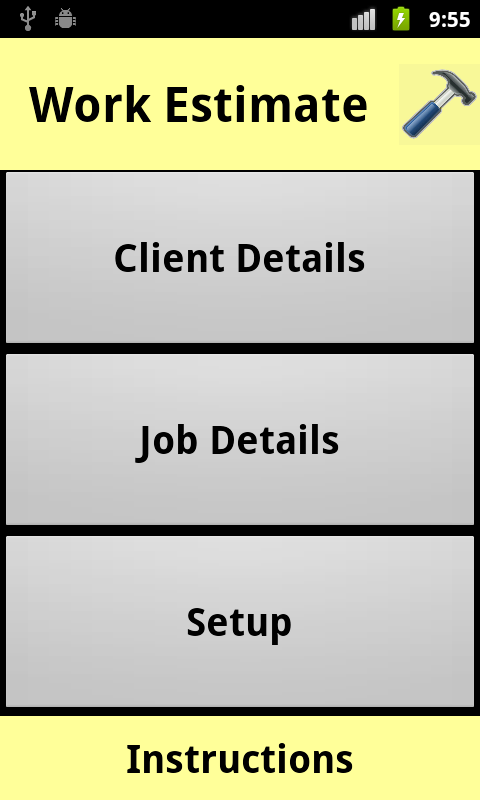
The Work Estimate app is designed to quickly assemble a job estimate at the site and immediately email it to the client.
In addition to also sending a copy to the contracting company, this estimate is stored and forms the basis to automatically send the final invoice.
COMPANY SETUP
To setup the app for the first time, you enter some basic information about your company, the name, phone number, email and contact person.
On the landing Job Estimate page, tap Setup and type this information into the appropriate text entry boxes on the Company Info page. Tap Save and then review your entries to ensure they are correct.
Note that this Setup needs only be done once, when the app is first installed. The information is stored permanently on the phone afterwards.
CUSTOMER INFO
To initiate a job estimate, tap the Customer Info button on the app landing page screen and then enter the requested informatoion about the client; their name, phone, email and any other comments you choose. After that is completed, tap the Save button.
Note that the Client information is stored by their phone number, so it is always necessary to enter something there.
JOB ESTIMATE
Next step is to return to the Job Estimate landing page and tap Job Details.
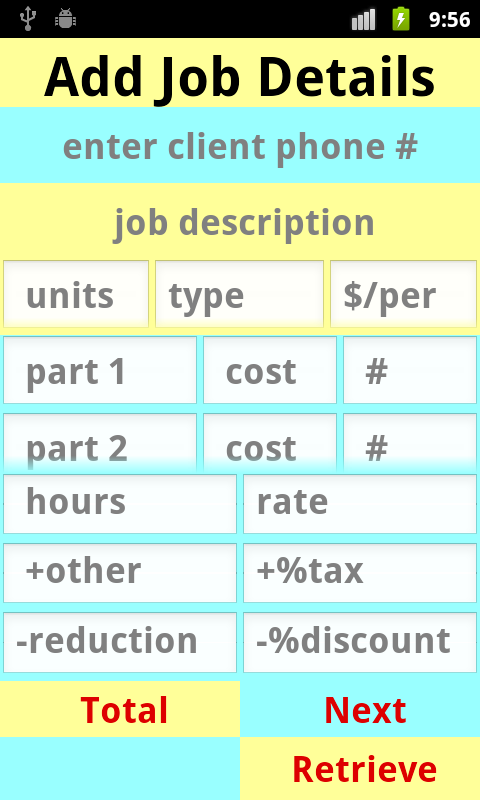
On the Add Job Details page, first enter the client phone number at the top, then a job description just below that. (Just tap each text entry box to bring up the keyboard, and then the back button of the phone when you are done with that item.)
You have several ways to can enter the job details.
First is a line beginning with Units. You might use this if you are estimating based on square feet, for example, but it is not mandatory. Enter the number of units, their type ()such as sq ft), and finally enter your billing charge per unit.
If you scroll down this Unit line, there is another (optional) line into which you can enter the dimensions of the area for which the Units number refers. After the length and width are entered, tap Area. The answer will appear in the Units box in the upper of the two lines.
Next down, if you wish to list parts, there is a scrolling section for parts 1 through 4. Depending on the job, or your preference, it is optional whether you enter any parts at all.
For each part type, enter the name, the cost (do not enter the dollar sign) and the number into the appropriate sections. If you do not enter the number (#), it will be assumed to be 1.
Below the parts section is an optional line where you can enter your billable hours and hourly rate (do not enter the dollar sign).
The next line down has a box marked Other where you can enter any other charges in your estimate. In the simplest form of an estimate, this might be the only text box that you filled in at all.
To the right is the final text entry box into which you enter the percentage tax which will be added to your bill, 13 for example (do not enter the percentage symbol).
The bottom text entry line is for reductions. These can be either a fixed amount like 200 (do not enter the dollar sign) entered into the left box, or else a percentage discount like 10, for example for a 10% seniors discount (do not enter the percentage symbol).
When all the info that you choose to enter is complete, tap Total and that amount will appear in the blue rectangle at the bottom left of the screen. If this seems OK, tap Next to go to the Review Summary page.
Should you wish to retrieve the estimate details later, just type in the client phone number at the top and tap the yellow Retrieve button at the bottom right of the screen.
SENDING THE ESTIMATE
Assuming you had entered the client information properly, and repeated the client phone number on the Job Detail page, then the client details will be shown at the top, in addition to the job item amounts.
Carefully check the amounts to ensure they are exactly as intended. Then tap Send Estimate and an email containing the estimate summary will be sent to the client, and another copy sent to your company email for a record.
SENDING AN INVOICE
After the work is completed, you can also use the app to send a final invoice.
Return to the Job Detail page and enter the client phone number and then tap the Retrieve button. The estimate details should re-appear in the appropriate text boxes. Then type Next to go to the Review Summary page.
You now enter the payments details into the white Payment Terms box, for example Due within 30 days. Then tap Send Invoice and a copy will be sent to the client and another to your company email.
FINAL ADVICE
Do test the app first with an imaginary client, to which you assign your own email address. Follow all the steps and you should receive two copies of the estimate and two of the invoice to your own company's email.
POCKET SURVEYOR AND OTHER APPS