PICTURE
DEFINITION
An evaluation of an unfinished user interface, done about three times
during each iterative design cycle, which aims to expose usability
problems that exist in the current iteration.
-
Contrasts with "summative evaluation," which is done when the
interface is complete, and with "human factors testing," which is
done in a more carefully controlled research setting.
QUESTIONS ANSWERABLE DURING FORMATIVE EVALUATION
- Are parts of the interface error-prone?
-
Do some tasks take more time than expected?
-
Do users find some tasks especially difficult?
-
Does the interface violate common usability guidelines?
-
Is there sufficient online help?
-
What changes would users like to see?
-
What gripes do users have?
-
What mistakes do users make?
-
Where are users likely to get stuck?
-
Will users need a wizard (intelligent agent) to guide them through
certain complex tasks?
BENEFITS OF FORMATIVE EVALUATION
- May be done very early in the design process, when about 10% of
the project resources have been expended
-
May give the first solid measurements of task performance
-
May help designers gain empathy for persons trying to use the
software in real situations
-
May help developers decide when the project can move on to the
next stage
-
May increase user interest and eventual acceptance of the final
product
-
May uncover problems that were not noticed during iterative
prototyping
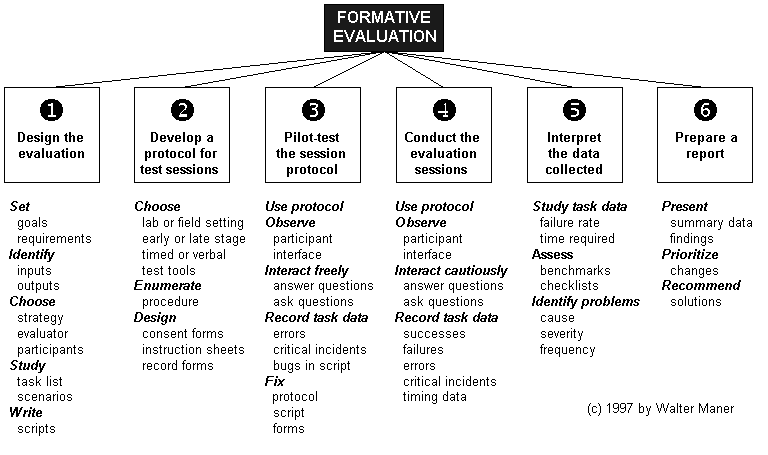
STEP 1
DESIGN THE EVALUATION.
- Set goals.
- DIAGNOSIS
To determine whether any usability problems exist
-
VERIFICATION
To determine whether the design meets benchmarks and satisfies
specified usability requirements
-
VALIDATION
To determine whether the design will be usable in practice by
its intended users
- DIAGNOSIS
- Identify desired inputs and outputs.
- Possible INPUTS
- Interface prototype
-
Question list, if doing a structured interview
-
Usability checklist, if doing heuristic evaluation
-
Usability benchmark requirements
-
Various testing scripts derived from task scenarios
- Interface prototype
- Possible OUTPUTS
- Individual test reports
-
Aggregate or tabular data from sets of test reports
-
Analysis of problems found
-
Prioritized list of change requests
- Individual test reports
- Possible INPUTS
- Choose an evaluation strategy, which could include one or more of
the following:
- Automatic event-level test data collection and statistical
analysis by specialized testing software
-
Professional review by a human-computer interaction expert
-
Heuristic evaluation based on a detailed checklist derived from
applicable GUI design principles or guidelines
-
User survey
- User preference questionnaire,
where each Participant ranks pre-selected interface features
on an agree--disagree scale
-
Structured interview,
where each Participant is asked a pre-planned series of
questions after the test session is complete
-
Focus groups,
where a trained facilitator leads a small group of
participants through a pre-planned series of questions or
issues.
- User preference questionnaire,
- Scenario-based, script-driven testing
- Inputs
- oral and/or written step-by-step, subtask-by-subtask
instructions for the Participant
-
given in the form of a script derived from one of the
task scenarios
-
written step-by-step, subtask-by-subtask instructions for
the Evaluator
-
given in the form of a script, similar to the
Participant's script, but including special testing
instructions and space for recording data
- oral and/or written step-by-step, subtask-by-subtask
- Outputs
- either (a) the time Participant took to complete each
subtask if testing performance (e.g., on benchmark tasks)
or (b) the Participant's verbal protocol if Participant
was asked to "talk aloud" during the test
-
log of errors that the Participant made on each subtask
- any impasse that prevents completion of a subtask
-
any wrong turn that delays completion of a subtask
- any impasse that prevents completion of a subtask
- hints, if any, given to Participant by Evaluator on each
subtask
-
final outcome of each subtask
- abandoned after ___ seconds and ___ errors
-
completed after ___ seconds and ___ errors
-
completed after ___ seconds with no errors but with
apparent difficulty
-
completed after ___ seconds with no errors and no
apparent difficulty
- abandoned after ___ seconds and ___ errors
- comments from Participant
-
comments from Evaluator
- either (a) the time Participant took to complete each
- Inputs
- Automatic event-level test data collection and statistical
- Choose an evaluator.
- For bias reduction, the Evaluator should not be a member of the
development team.
-
Evaluators should be receptive and open-minded persons,
prepared to respectfully receive as much negative feedback as
participants want to give.
- For bias reduction, the Evaluator should not be a member of the
- Choose test participants.
- Identify potential participants based on a profile of the
target population.
-
Divide participants into "usability classes" based on factors
deemed relevant, such as ...
- experience with computers
-
experience with similar systems
-
experience with this system
- experience with computers
- Employ three representative participants from each usability
class.
-
For subsequent rounds of testing, retain one participant from
the previous round and employ two new participants.
- Identify potential participants based on a profile of the
- If not already done, perform user task analysis and, from this,
build a hierarchical task model.
-
If not already done, construct a representative task scenario for
each KIND of high-level user task. "Obvious" tasks should not be
excluded.
-
Using representative task scenarios as a guide, create about a
half-dozen test scripts.
- SIMILARITIES Between Scenarios and Scripts
- Both have the same starting place.
-
Both point toward the same completion state or goal.
-
Both contain a strongly ordered, integrated sequence of
subtasks sufficient to achieve that goal.
-
Both contain mid-level subtasks or subgoals.
- Both have the same starting place.
- DIFFERENCES Between Scenarios and Scripts
- Scenarios mention low-level subtasks but scripts do not.
-
Scenarios make reference to specific elements of the
interface but scripts do not.
-
Scenarios describe in detail HOW the subtask was
accomplished but scripts only state WHAT the proposed
subtask is.
-
Scenarios describe what participants have done while scripts
list what participants will be asked to do.
- Scenarios mention low-level subtasks but scripts do not.
- EXAMPLE
- RIGHT for a Script (but too coarse-grained for a task
scenario):
Select "sugar" as an ingredient.
-
RIGHT for a Scenario (but too fine-grained for a script):
Open the drop-down list inside the box labeled "Ingredients"
and then click on the "sugar" item.
- RIGHT for a Script (but too coarse-grained for a task
- SIMILARITIES Between Scenarios and Scripts
STEP 2
DEVELOP A PROTOCOL FOR THE TEST SESSIONS.
- Decide how the script will be used.
- The Evaluator may give the entire script (the entire written
list of subtasks) to the Participant.
- Not recommended
-
May create pressure to finish or allow foreshadowing
effects.
- Not recommended
- The Evaluator may give written directions to the Participant
one subtask at a time, as required.
- Recommended
-
Works best for complex subtasks.
- Recommended
- The Evaluator may give oral directions to the Participant one
subtask at a time, as required.
- Recommended
-
Works best for simple subtasks.
- Recommended
- The Evaluator may give the entire script (the entire written
- Determine whether the session will be conducted in the laboratory
or in the field.
- Laboratory testing is often preferred for early- and mid-stage
testing.
-
Field testing is often preferred for late-stage testing.
- Laboratory testing is often preferred for early- and mid-stage
- Determine whether the testing will be done an an early stage or at
a later stage.
- Possible Hour-long Early-stage Protocol
- Set up (or reset) the test environment.
-
Put Participant at ease, establish cooperative atmosphere.
-
If not already done, witness the Participant's signing of
the informed consent form.
-
Give general instructions to the Participant, then prepare
to play the role of co-evaluator.
-
Run several scripts with Participant thinking aloud and the
Evaluator prompting, allowing discussion, without time
pressure.
-
Interview the Participant following a set list of questions.
-
Discuss the results with the Participant (debrief) and
answer questions.
- Set up (or reset) the test environment.
- Possible Hour-long Mid-stage Protocol
- Set up (or reset) the test environment.
-
Put Participant at ease, establish cooperative atmosphere.
-
If not already done, witness the Participant's signing of
the informed consent form.
-
Give general instructions to the Participant, then prepare
to play the role of observer.
-
Run two or three timed scripts.
- Participant reads the next subtask aloud (or hears it
read to them by the Evaluator)
-
As soon as the subtask has been read, the timer is
started.
-
When task is done or abandoned, record time spent on
task, number of errors and completion status.
- Participant reads the next subtask aloud (or hears it
- Allow free use of the system for 10 minutes, perhaps with
the Participant talking aloud.
-
Run two or three more timed scripts following the same
protocol as above.
-
Interview the Participant following a set list of questions.
-
Discuss the results with the Participant (debrief) and
answer questions.
- Set up (or reset) the test environment.
- NOTES
- For consistency and repeatability, an instruction sheet is
needed.
- explains it is the software being tested, not the
Participant (the interface is the "subject" of testing)
-
explains how long the test will take
-
explains the basic procedure to be followed
-
explains the rights the Participant has, including ...
- the right to stop the test at any time
-
the right to confidentiality
- the right to stop the test at any time
- explains what is being measured and why
-
explains why a non-disclosure agreement is necessary (if
it is)
- explains it is the software being tested, not the
- For ethical and legal reasons, a sign-off sheet is needed.
- to witness the fact that the Participant has made an
"informed consent"
-
to witness the fact that the Participant has agreed not
to disclose specified proprietary information
-
to witness the fact that the Participant has given up
various rights to the products of the testing process
(e.g., video footage)
- to witness the fact that the Participant has made an
- Other paperwork may be required depending on the situation.
- survey forms
-
pre- and post-tests
-
heuristic evaluation checklists
- survey forms
- For consistency and repeatability, an instruction sheet is
- Possible Hour-long Early-stage Protocol
- Determine whether to emphasize qualitative data or quantitative
data.
-
Identify tools to be used during testing.
-
Design the forms to be used during testing.
- consent forms
-
instruction sheets
-
record forms
- consent forms
STEP 3
PILOT-TEST THE SESSION PROTOCOL(S).
- Follow the "early stage" protocol described above.
-
Fix any problems that have been exposed.
- problems in the protocol
-
problems in the script
-
problems in the forms
- problems in the protocol
STEP 4
CONDUCT THE ACTUAL EVALUATION SESSIONS.
- As a backup, start recording the session on videotape, aiming the
camera so that it can "see" both the Participant's hands and the
computer screen.
-
Follow the session protocol.
-
Observe the Participant as they go about their tasks.
-
Log any "critical incident" that occurs and consider following up
such incidents with one or two open-ended, non-leading questions.
- After NEGATIVE Incidents
- Are you having a problem?
-
Are you stuck?
-
Do you need a hint?
-
Is that the result you wanted?
-
Is this more difficult than it should be?
-
What are you thoughts at this point?
-
What are you trying to do?
-
What did you think would happen?
- Are you having a problem?
- After POSITIVE Incidents
- Are you feeling more confident now?
-
Was there a specific clue that allowed you to solve the
problem?
-
What made you think this approach would work?
- Are you feeling more confident now?
- After NEGATIVE Incidents
- Take careful notes in real time. Contemporaneous note-taking is
known to be more efficient that, say, taking notes afterward while
watching the session on videotape.
-
Thank and reward the Participant, possibly paying them minimum
wage + $1.
STEP 5
INTERPRET THE DATA COLLECTED.
- Use all available data to identify interface problems.
- failure rates on particular tasks
-
time required on particular tasks
-
failed benchmarks
-
unchecked items on usability checklists
- failure rates on particular tasks
- Characterize problems.
- According to CAUSE (if known)
-
According to FREQUENCY OF OCCURRENCE
-
According to SEVERITY
- CRITICAL
- Critical problems include all those that make it
impossible for the Participant to complete a task.
-
IMPLICATION: The product cannot be distributed with such
a problem, not even to beta testers.
- Critical problems include all those that make it
- SERIOUS
- Serious problems include those that allow the Participant
to suffer the damaging effects of a mistake that a better
design might have prevented.
-
IMPLICATION: The product could, if necessary, be
distributed with such a problem but only to beta testers.
- Serious problems include those that allow the Participant
- MINOR
- Minor problems include those that cause the Participant
to become momentarily distracted, confused or
disoriented.
-
IMPLICATION: The product could, if necessary, be
distributed to customers with this problem.
- Minor problems include those that cause the Participant
- CRITICAL
- According to CAUSE (if known)
STEP 6
PREPARE A REPORT.
- Give a summary of findings, subtask by subtask, in a table under
these headings:
- task description
-
task completion status
- task abandoned ___ times after ___ seconds (average) and ___
errors (average)
-
task completed successfully ___ times in ___ seconds
(average) after ___ errors (average)
-
NOTE: If there is concern about statistical "outliers," the
median and standard deviation may be reported as well.
- task abandoned ___ times after ___ seconds (average) and ___
- task description
- If usability performance requirements were developed for specific
tasks or subtasks, give a summary of relevant findings in a table
under these headings:
- general description of the task or subtask
-
specific benchmark applied
-
worst acceptable performance on this benchmark
(maximum errors or maximum time)
-
planned target performance on this benchmark
(acceptable errors or acceptable time)
-
best possible performance on this benchmark
(minimum errors or minimum time)
-
observed performance on this benchmark
(actual errors or actual time)
- general description of the task or subtask
- If heuristic evaluation was used, list areas where design fails
applicable guidelines.
-
List all problems exposed during testing in a table under these
headings:
- description of the problem
-
severity of the problem
-
frequency of the problem
-
possible remedy for the problem
- description of the problem
- List changes needed to the interface in priority order,
considering these possibly conflicting rules:
- Give a high priority to the more severe problems.
-
Give a high priority to the more common problems.
-
Give a high priority to problems that can be fixed cheaply.
-
Give a high priority to problems that can be fixed quickly.
- Give a high priority to the more severe problems.
- Recommend changes.
-
Review session videotapes and prepare a collage of short clips to
support these change requests.